CustomAttributes from Hyper-V to Nutanix Categories

Update:
Uppon request from fellow NTC colleuge, i made a version of this script for VMware vSphare tags also. Take a look this post for more information about that.
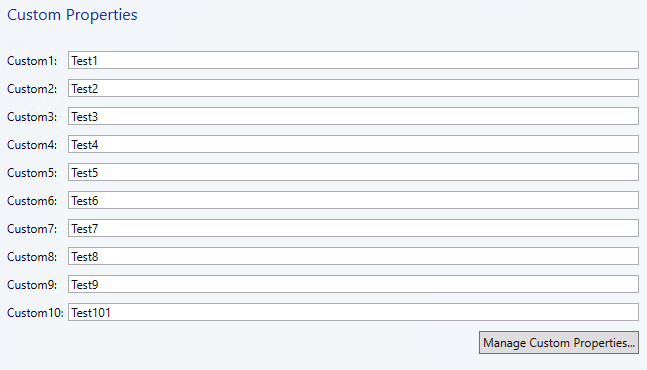
Recently, I received a request asking if I had encountered a customer using Custom Attributes on their VMs in Hyper-V and System Center Virtual Machine Manager (SCVMM), and whether we had ever mapped those Custom Attributes to categories in Prism. Manually mapping a small number of VMs with these attributes is relatively straightforward. However, what happens when you have thousands of virtual machines in Hyper-V that you're migrating to Nutanix, and on top of that, are using all ten custom attributes for each VM? This can be a major impediment to your migration.
Join me as I propose a solution to tackle this issue.
Step 1: Export a list of your SCVMM VMs and Custom Attributes to a .csv file.
First, we need a list of all our Virtual Machines and their associated custom attributes. For this task, we'll use PowerShell – the preferred method when working with Hyper-V and SCVMM. I have compiled a script to facilitate this process. Below is a breakdown followed by the full script:
- First we need to load the appropriate Modules:
# Import the SCVMM PowerShell module
Import-Module -Name "VirtualMachineManager"- Then we define our SCVMM server.
# Connect to the SCVMM server
$VMMServer = "SCVMMCOMPUTERNAME" # Change this to your SCVMM Hostname
Get-SCVMMServer -ComputerName $VMMServer- Then we defines the $VMs variable, and define the maxCustomProperties, Since you're limited to 10 custom attributes per VM in SCVMM 2019 there's also the max in our script
# Retrieve all virtual machines
$VMs = Get-SCVirtualMachine

# Define the maximum number of custom properties expected
$maxCustomProperties = 10- Then, we loop trough all the VMs in the SCVMM installation with ForEach
# Create a CSV object for each virtual machine with its custom properties
$vmInfo = $VMs | ForEach-Object {
    # Create an ordered dictionary to store VM info and custom properties
    $vmData = [ordered]@{}
    $vmData["Name"] = $_.Name

    # Initialize placeholders for custom properties
    for ($i = 1; $i -le $maxCustomProperties; $i++) {
        $vmData["Custom$i"] = $null
    }

    # Assign values to custom properties from the array
    for ($i = 0; $i -lt $_.CustomProperties.Count; $i++) {
        $propertyName = "Custom" + ($i + 1)
        $vmData[$propertyName] = $_.CustomProperties[$i]
    }

    # Convert the ordered dictionary to a PSCustomObject for export
    [PSCustomObject]$vmData
}- Then lastly we export that info to a comma separated file .csv
# Export the information to a CSV file
$vmInfo | Export-Csv -Path "C:\temp\VMs_Custom_Attributes.csv" -NoTypeInformation
The Script as a whole looks like this.
# Import the SCVMM PowerShell module
Import-Module -Name "VirtualMachineManager"

# Connect to the SCVMM server
$VMMServer = "SCVMMCOMPUTERNAME" # Change this to your SCVMM Hostname
Get-SCVMMServer -ComputerName $VMMServer

# Retrieve all virtual machines
$VMs = Get-SCVirtualMachine

# Define the maximum number of custom properties expected
$maxCustomProperties = 10

# Create a CSV object for each virtual machine with its custom properties
$vmInfo = $VMs | ForEach-Object {
    # Create an ordered dictionary to store VM info and custom properties
    $vmData = [ordered]@{}
    $vmData["Name"] = $_.Name

    # Initialize placeholders for custom properties
    for ($i = 1; $i -le $maxCustomProperties; $i++) {
        $vmData["Custom$i"] = $null
    }

    # Assign values to custom properties from the array
    for ($i = 0; $i -lt $_.CustomProperties.Count; $i++) {
        $propertyName = "Custom" + ($i + 1)
        $vmData[$propertyName] = $_.CustomProperties[$i]
    }

    # Convert the ordered dictionary to a PSCustomObject for export
    [PSCustomObject]$vmData
}

# Export the information to a CSV file
$vmInfo | Export-Csv -Path "C:\temp\cvs_vms.csv" -NoTypeInformation
After running this script, you should have a .csv file resembling the following format.

Let's use this information and create a category in Prism Central.
Step 2. Using Ansible to create Categories and Values and assign your migrated VMs to it.
For the next part of the process, I’ll use Ansible to create Categories and Values and assign your migrated VMs accordingly. Ansible is my tool of choice for automation; there might be more efficient ways to complete these tasks, but this is my preferred method. I will break down the playbook into different sections and explain each part. The full playbook is available below the explanation.
Note: To run Ansible against Nutanix, you need to have the necessary setup on your machine. I use a Linux box with all the required Ansible Modules, etc. For a guide on how to get started with Ansible and Nutanix module, check out this article I’m linking below from nutanix.dev


I will break down the playbook in to different sections and explaining the different sections. Full playbook available below the content.
- First we will need some basic stuff in our playbook. We need to define our Nutanix Cluster, and we need to define the collections used etc. I store the cluster information in vars/nutanix_info.yml and I store all the secrets in an encrypted ansible-vault file in vars/secrets.yml
Then we use variables for the connection info to the nutanix cluster.
- name: Create CustomAttributes as Category and Values.
  hosts:
    - localhost
  connection: local
  gather_facts: false
  vars_files:
    - vars/nutanix_info.yml
    - vars/secrets.yml
  collections:
    - nutanix.ncp
  module_defaults:
    group/nutanix.ncp.ntnx:
      nutanix_host: "{{ pc_ip }}"
      nutanix_username: "{{ vault_pc_username }}"
      nutanix_password: "{{ vault_pc_password }}"
validate_certs: false- Now of to the tasks. First we need to gather some information and interpet the information that's provided in the .csv file.
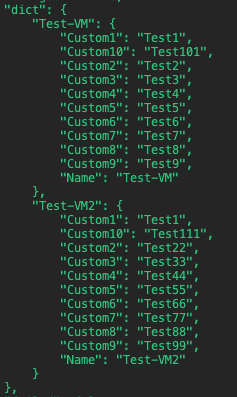
We first read the .csv file to get all the information stored in a variable that i call csv_vms.
Then we use that data to construct a dictionary of all the vms and all the corresponding CustomAttributes for later use in the playbook.
  tasks:
  ## Gather information from CSV file ##
  - name: Read VM Custom Attributes from CSV
    community.general.read_csv:
      path: cvs_vms.csv
      key: Name
    register: csv_vms

  - name: Construct Custom Attributes list for each VM
    ansible.builtin.set_fact:
      vm_custom_attributes: >-
        {{
          vm_custom_attributes | default({}) | combine({ item.key: (item.value | dict2items | selectattr('key', 'ne', 'Name') | map(attribute='value') | list) })
        }}
    loop: "{{ csv_vms.dict | dict2items }}"
    loop_control:
      loop_var: item
    no_log: true
The debug output of those two tasks/variables should look something like this.
- csv_vms:

- vm_custom_attributes:
- Now that we have this data structured we need to gather information about the VMs at the nutanix side to fetch their UUIDs and then constrcut a new list containing all the customattributes, uuids and vmnames to later be able to update the VMs with their CustomAttributes.
The first task in this block uses the Nutanix Ansible module to loop trouh all the keys in the list we constructed in the earlier task using the loop function on the variable vm_custom_attributes and specficaly only the keys, witch in this case is the VM names.
The second task in this block uses the information we've gathered in the variable vm_facts by looping trough the responses and constrcut a list that contains the UUID, VMname, & all the CustomAttributes that belongs to the corresponding VMs in the variable we defined at the very beginning of the playbook vm_custom_attributes
  ## Gather information about VMs and construct list of category values and vm UUIDs ##
  - name: "Nutanix: Gather Facts about VMs"
    nutanix.ncp.ntnx_vms_info:
      filter:
        vm_name: "{{ item }}"
      kind: vm
    register: vm_facts
    loop: "{{ vm_custom_attributes.keys() | list }}"
    loop_control:
      loop_var: item

  - name: Construct vm_info_list with VM names, UUIDs, and custom attributes
    ansible.builtin.set_fact:
      vm_info_list: "{{ vm_info_list | default([]) + [vm_info_item] }}"
    vars:
      vm_info_item: >-
        {
          "vm_name": "{{ vm_item.item }}",
          "custom_attributes": "{{ vm_custom_attributes[vm_item.item] }}",
          "vm_uuid": "{{ vm_item.response.entities | map(attribute='metadata') | map(attribute='uuid') | first | default('') }}"
        }
    loop: "{{ vm_facts.results }}"
    loop_control:
      loop_var: vm_item
    no_log: true
The debug output of the vm_info_list variable should looks something like this containing all the data we need to start creating stuff. :)
- vm_info_list

- Now that we have gathered all the information that we need. We can create the category that we want the VMs to go in to. And use all the CustomAttributes as Category Values.
First we check if the Category are already created, if it's not present we go ahead and create it using the nutanix.ncp ansible module and when statements.
In this example i call my Category SCVMM-CustomAttributes.
The reason that i added the check if the category is present is if we want to run the script multiple times. Say that you make this in batches. And you're migrating 200VMs at a time. Then we would not like to create the Category every time, so. First, check, if it does not exsist, create it :)
And after creation we gather information about it again.
  ## Gather information about the Category and create it if it does not exists ##
  - name: Check if category exists
    nutanix.ncp.ntnx_categories_info:
        name: "SCVMM-CustomAttributes"
    register: category_info_result

  - name: Create category if it does not exsist
    nutanix.ncp.ntnx_categories:
      state: "present"
      name: "SCVMM-CustomAttributes"
      desc: "Automated Category Migrated from SCVMM"
    when: category_info_result.response | dict2items | length == 0
    register: category_creation_result

  - name: Gather info about the newly created category
    nutanix.ncp.ntnx_categories_info:
        name: "SCVMM-CustomAttributes"
register: category_info_result- Once we know that the Category is present, we can check if there is any CustomAttributes stored as Values in the Category and what CustomAttributes is not created in the Category (same idea goes here, if your run the script multiple times, we would need to only create the values that are not present).
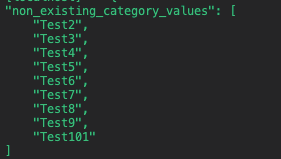
We do that by comparing the vm_custom_attributes variable we defined earlier with the category_info_result above, and construct a list of non_existing_category_values, so we can go ahead and create them:
 ## Gather information about the Category values and determine the non existing category vales ##
  - name: Set fact for non-existing category values
    set_fact:
non_existing_category_values: "{{ (vm_custom_attributes.values() | flatten | unique) | difference(updated_category_info_result.response.category_values.entities | map(attribute='value') | list) }}"- The debug output of contain all the values that's not present in the category, the list should look something like below:
- The next step is to create the values that does not exsist. We do that by using the nutanix.ncp ansible module for Categories, and we take our newly crafted list of missing category values in the variable non_existing_category_values in this task and create the values, but only if they don't exsist, alredy present values does not have any need to be created, and we determine that using the when statement to run the task only if the list in the variable non_exsisting is bigger than > 0:
  ## IF there is non existing category values add dem to the Category ##
  - name: Add non-existing values to the category
    nutanix.ncp.ntnx_categories:
      state: "present"
      name: "SCVMM-CustomAttributes"
      values: "{{ non_existing_category_values }}"
    when: non_existing_category_values | length > 0
    register: category_update_result
The output should verify that the values are added via the API:

- Next we need to add all the VMs to the coresponding category values. We again do this with the nutanix.ncp module and specificaly the ntnx_vms.
we loop trough the list that we crafted earlier in the variable vm_info_list that looked like this:

- When we loop trough the list we use the vm_info_list.vm_uuid variableto identify the VM using the UUID towards the Nutanix API, and we use the custom attributes from the vm useing vm_info_list.custom_attributes to add the VM to the corresponding category values foreach VM in the list.
We also use a when statement to check if the value of vm_info_list.vm_uuid is empty, then it should skip that entry in the list, because that value will be empty if the VM is not yet Migrated from Hyper-V to Nutanix and non present in the Nutanix Cluster.
The task looks like this:
  ##Add Categories and Values to VMs ##
  - name: Update VMs with category values
    nutanix.ncp.ntnx_vms:
      vm_uuid: "{{ item.vm_uuid }}"
      categories:
        SCVMM-CustomAttributes: "{{ vm_custom_attributes[item.vm_name] }}"
    loop: "{{ vm_info_list }}"
    loop_control:
      loop_var: item
when: item.vm_uuid | length > 0- The output should look like this:

Here's the complete playbook as a whole:
#code: ansible
- name: Create CustomAttributes as Category and Values.
  hosts:
    - localhost
  connection: local
  gather_facts: false
  vars_files:
    - vars/nutanix_info.yml
    - vars/secrets.yml
  collections:
    - nutanix.ncp
  module_defaults:
    group/nutanix.ncp.ntnx:
      nutanix_host: "{{ pc_ip }}"
      nutanix_username: "{{ vault_pc_username }}"
      nutanix_password: "{{ vault_pc_password }}"
      validate_certs: false
  tasks:
  ## Gather information from CSV file ##
  - name: Read VM Custom Attributes from CSV
    community.general.read_csv:
      path: cvs_vms.csv
      key: Name
    register: csv_vms

  - name: Construct Custom Attributes list for each VM
    ansible.builtin.set_fact:
      vm_custom_attributes: >-
        {{
          vm_custom_attributes | default({}) | combine({ item.key: (item.value | dict2items | selectattr('key', 'ne', 'Name') | map(attribute='value') | list) })
        }}
    loop: "{{ csv_vms.dict | dict2items }}"
    loop_control:
      loop_var: item
    no_log: true

  ## Gather information about VMs and construct list of category values and vm UUIDs ##
  - name: "Nutanix: Gather Facts about VMs"
    nutanix.ncp.ntnx_vms_info:
      filter:
        vm_name: "{{ item }}"
      kind: vm
    register: vm_facts
    loop: "{{ vm_custom_attributes.keys() | list }}"
    loop_control:
      loop_var: item

  - name: Construct vm_info_list with VM names, UUIDs, and custom attributes
    ansible.builtin.set_fact:
      vm_info_list: "{{ vm_info_list | default([]) + [vm_info_item] }}"
    vars:
      vm_info_item: >-
        {
          "vm_name": "{{ vm_item.item }}",
          "custom_attributes": "{{ vm_custom_attributes[vm_item.item] }}",
          "vm_uuid": "{{ vm_item.response.entities | map(attribute='metadata') | map(attribute='uuid') | first | default('') }}"
        }
    loop: "{{ vm_facts.results }}"
    loop_control:
      loop_var: vm_item
    no_log: true

  ## Gather information about the Category and create it if it does not exists ##
  - name: Check if category exists
    nutanix.ncp.ntnx_categories_info:
        name: "SCVMM-CustomAttributes"
    register: category_info_result

  - name: Create category if it does not exsist
    nutanix.ncp.ntnx_categories:
      state: "present"
      name: "SCVMM-CustomAttributes"
      desc: "Automated Category Migrated from SCVMM"
    when: category_info_result.response | dict2items | length == 0
    register: category_creation_result

  - name: Gather info about the newly created category
    nutanix.ncp.ntnx_categories_info:
        name: "SCVMM-CustomAttributes"
    register: updated_category_info_result

  ## Gather information about the Category values and determine the non existing category vales ##
  - name: Set fact for non-existing category values
    ansible.builtin.set_fact:
      non_existing_category_values: "{{ (vm_custom_attributes.values() | flatten | unique) | difference(updated_category_info_result.response.category_values.entities | map(attribute='value') | list) }}"

  ## IF there is non existing category values add dem to the Category ##
  - name: Add non-existing values to the category
    nutanix.ncp.ntnx_categories:
      state: "present"
      name: "SCVMM-CustomAttributes"
      values: "{{ non_existing_category_values }}"
    when: non_existing_category_values | length > 0
    register: category_update_result

  ## Add Categories and Values to VMs ##
  - name: Update VMs with category values
    nutanix.ncp.ntnx_vms:
      vm_uuid: "{{ item.vm_uuid }}"
      categories:
        SCVMM-CustomAttributes: "{{ vm_custom_attributes[item.vm_name] }}"
    loop: "{{ vm_info_list }}"
    loop_control:
      loop_var: item
    when: item.vm_uuid | length > 0
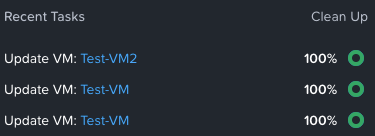
Check the Nutanix Prism GUI to verify the results
If we now log in to the Nutanix Prism Central Interface. We will se that there are abunch of completed tasks:
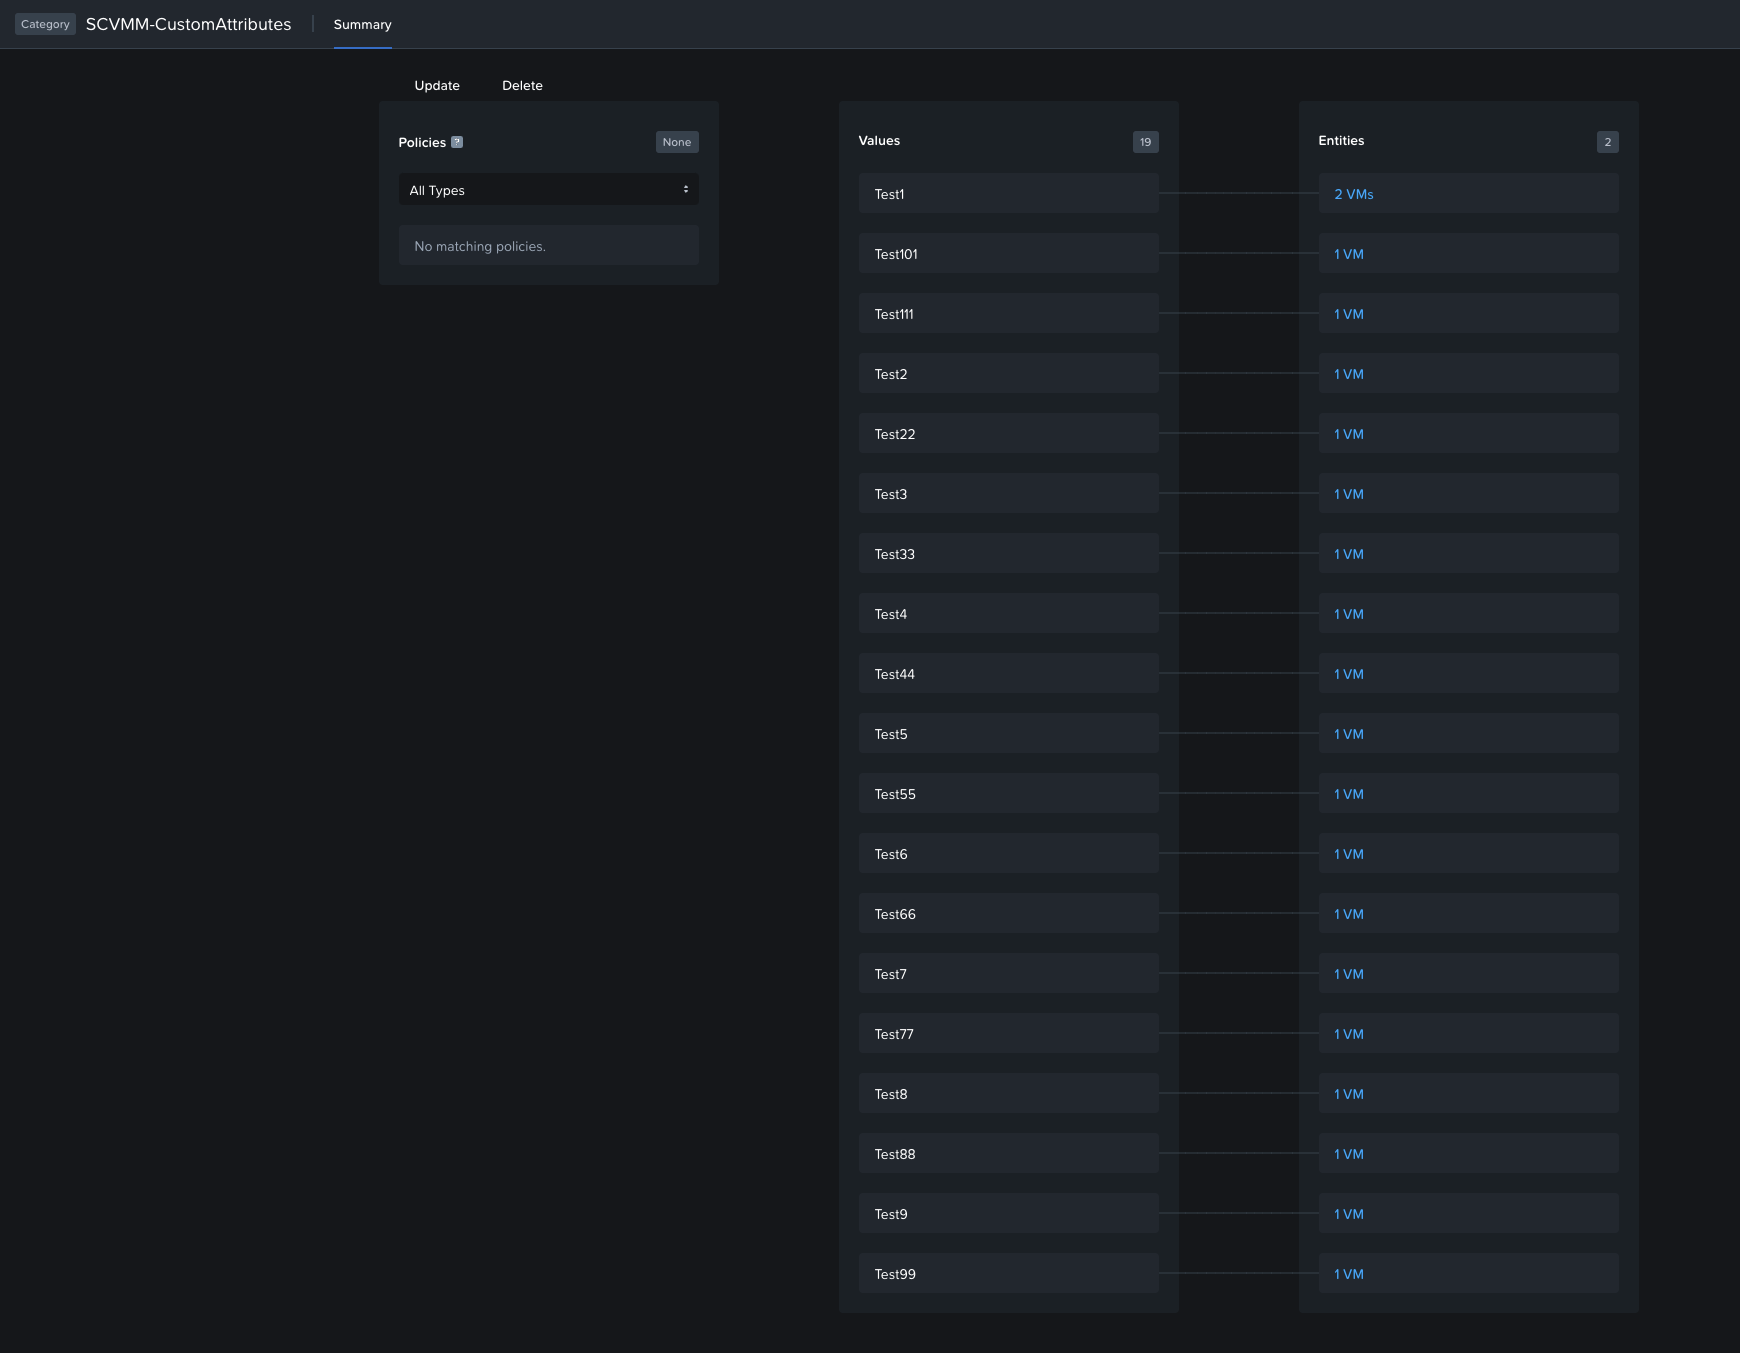
And if we go in to the categories menu you should see your newly created category called "SCVMM-CustomAttributes" and containing your CustomAttributes from SCVMM:

Also we can drill down to the category itself and se that there are attached VMs to the values
And if we go to the VMs tab under "Infrastructure" you should be able to filter on your old CustomAttributes, and se all the VMs that belongs to that category :)
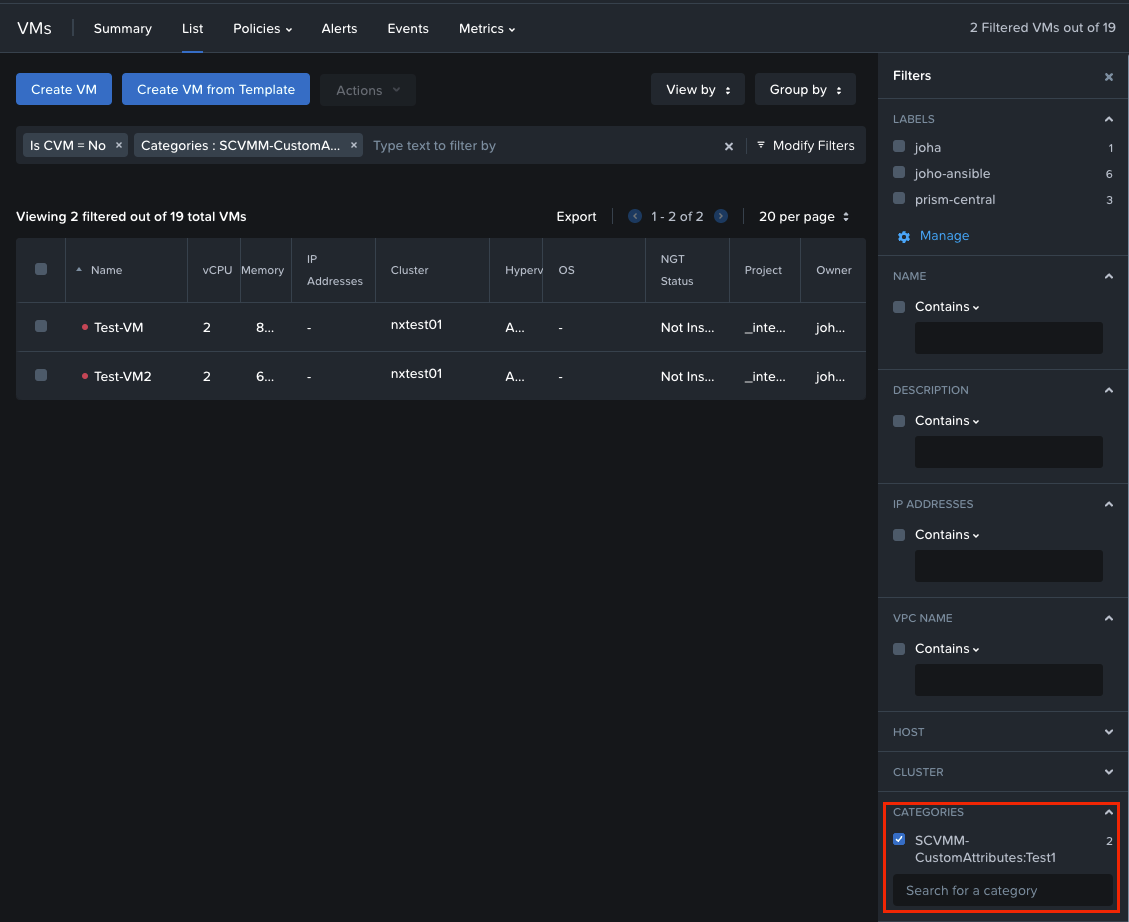
Now you can start doing stuff with your Category/Values, applying storage policies, and other things that categories are nice to use for automation and other stuff, like costgovernance etc.
Conclution
This blog post outlines a method to significantly reduce the manual workload associated with migrating a large volume of virtual machines with various custom attributes.
This approach utilizes a single category with multiple values, but you could also create a separate category for each SCVMM Custom Attribute. However, this might lead to a more cluttered setup.
Basic knowledge of Ansible and its configuration for use with Nutanix environments is assumed. For additional information and references that were instrumental in composing this playbook, see the list below:
Thanks for reading and hope this helps someone :)