Installing Outline Wiki with docker-compose on ubuntu 22.04

I was looking for a nice confluence like wiki open source software that i could host on my own servers. The need for personal documentation/wiki software arose when i came in to the facinating world of home automation.
I found Outline witch is available both as paid software if you use it for organisations or if you want to buy their Cloud hosted solutions.
The perfect thing, for personal use, it's open source and you can host it with docker-compose on you linux machine.
Installation
Since the installation of the opensource selfhosted of outline in docker-compose where very very very difficult, i just had to write a blogpost about it :)
Lets go! :)
Prerequisites
First of all, there is a lot of moving parts in this installation.
Docker compose
Start by installing your docker and docker compose on your server.
I used this guide/post to install docker compose.
DNS
To start, we need three DNS values needed for this installation.
- One dns value for the wiki it self.
Example: wiki.yourdomain.com - One dns value for the s3 storage
Example: s3.yourdomain.com - One Dns value for s3 storage admin
Examlpe: s3-admin.yourdomain.com
Hex Secrets
Later in this guide when we create the .evn file we need two hex32 values for secrets. Go in to your Ubuntu box and run the command:
openssl rand -hex 32Run the command two times and save the results for later use in this guide.
After that we need to set up our reverse proxy to reverse handle incoming traffic towards our docker container.
Nginx
I use nginx on a separate host that's faceing the internet.
Also on that nginx server i use CrowdSec. My god friend Vacum have writen some nice guides on CrowdSec and Nginx. Checkout his blog here.
For detailed guide on how to set up nginx, se this post
I created separate vhosts for each site. Configuration example below..
server {
  location / {
      proxy_set_header X-Forwarded-For $proxy_add_x_forwarded_for;
      proxy_set_header X-Forwarded-Proto $scheme;
      proxy_set_header X-Real-IP $remote_addr;
      proxy_set_header Host $http_host;
      proxy_pass http://<ip-of-backend-server>:3000;
  }
  server_name wiki.yourdomain.com;
  listen 80;
}
Then i use certbot to get a certificate for my site:
sudo certbotChose wiki.yourdomain.com and then that should generate a file that looks something like this
server {
  location / {
      proxy_set_header X-Forwarded-For $proxy_add_x_forwarded_for;
      proxy_set_header X-Forwarded-Proto $scheme;
      proxy_set_header X-Real-IP $remote_addr;
      proxy_set_header Host $http_host;
      proxy_pass http://<ip-of-backend-server>:3000;
  }
  server_name wiki.yourdomain.com;


    listen 443 ssl; # managed by Certbot
    ssl_certificate /etc/letsencrypt/live/wiki.yourdomain.com/fullchain.pem; # managed by Certbot
    ssl_certificate_key /etc/letsencrypt/live/wiki.yourdomain.com/privkey.pem; # managed by Certbot
    include /etc/letsencrypt/options-ssl-nginx.conf; # managed by Certbot
    ssl_dhparam /etc/letsencrypt/ssl-dhparams.pem; # managed by Certbot


}
server {
    if ($host = wiki.yourdomain.com) {
        return 301 https://$host$request_uri;
    } # managed by Certbot


  server_name wiki.yourdomain.com;
  listen 80;
    return 404; # managed by Certbot


}
Repeat that step for each s3.yourdomain.com and s3-admin.yourdomain.com
The ports for s3 and s3-admin is 9000 and 9001
Authentication trough slack
There are numerous options to authenticate against your Outline Wiki, in my case i use slack integration thats built in.
For detailed steps on how to set up the slack integration take a look at this post from Outline.
On the same documentation page you have integrations for other providers :)
Installation of Outline
Okay, so, lets install the outline wiki.
First we need to create the folder where we want to store our outline wiki, lets create it and cd in to that folder.
cd /docker
sudo mkdir /outline-wiki
cd /outline-wiki
Then we need to create the docker-compose.yml file
sudo nano docker-compose.yml In that file, put in this text
version: "2"
services:
  outline_redis:
    image: redis
    restart: always
    container_name: outline_redis
    networks:
      - outline-internal

  outline_postgres:
    image: postgres:13
    restart: always
    container_name: outline_postgres
    environment:
      - POSTGRES_PASSWORD=${POSTGRES_PASSWORD}
      - POSTGRES_USER=outline
      - POSTGRES_DB=outline
    networks:
      - outline-internal
    volumes:
      - /mnt/containers/outline/container-data/db:/var/lib/postgresql/data:Z

  outline_minio:
    image: minio/minio
    restart: always
    container_name: outline_minio
    volumes:
      - /mnt/containers/outline/container-data/data:/data:Z
    environment:
      - MINIO_ROOT_USER=minio
      - MINIO_ROOT_PASSWORD=${MINIO_ROOT_PASSWORD}
      - MINIO_BROWSER_REDIRECT_URL=${MINIO_BROWSER_REDIRECT_URL}
    ports:
      - 9000:9000
      - 9001:9001
    networks:
      - reverseproxy-nw
    command: "server /data --console-address :9001"

  outline:
    image: outlinewiki/outline
    user: root
    restart: always
    container_name: outline
    command: sh -c "yarn sequelize:migrate --env=production-ssl-disabled && yarn start --env=production-ssl-disabled"
    depends_on:
      - outline_postgres
      - outline_redis
      - outline_minio
    environment:
      - PGSSLMODE=disable
      - SECRET_KEY=${SECRET_KEY}
      - UTILS_SECRET=${UTILS_SECRET}
      - DATABASE_URL=postgres://outline:${POSTGRES_PASSWORD}@outline_postgres:5432/outline
      - REDIS_URL=redis://outline_redis:6379
      - URL=${WIKI_URL}
      - PORT=3000
      - AWS_ACCESS_KEY_ID=minio
      - AWS_REGION=us-east-1
      - AWS_SECRET_ACCESS_KEY=${MINIO_ROOT_PASSWORD}
      - AWS_S3_UPLOAD_BUCKET_URL=${WIKIDATA_URL}
      - AWS_S3_UPLOAD_BUCKET_NAME=wiki
      - AWS_S3_UPLOAD_MAX_SIZE=26214400
      - AWS_S3_FORCE_PATH_STYLE=true
      - AWS_S3_ACL=private
      - SLACK_APP_ID=<SLACK APP ID>
      - SLACK_KEY=<SLACK APP KEY>
      - SLACK_SECRET=<SLACK APP SECRET>
      - SLACK_VERIFICATION_TOKEN=<SLACK APP VERIFICATION TOKEN>
      - FORCE_HTTPS=false
    ports:
      - 3000:3000
    networks:
      - outline-internal
      - reverseproxy-nw

networks:
  outline-internal:
  reverseproxy-nw:
external: true- SLACK_APP_ID=<SLACK APP ID>
- SLACK_KEY=<SLACK APP KEY>
- SLACK_SECRET=<SLACK APP SECRET>
- SLACK_VERIFICATION_TOKEN=<SLACK VERIFICATION>
You should have those values after creating the slack app above.
As you can se in the docker-compose.yml we refer to other values that we should locate in a separate .evn file. So lets create that.
sudo nano .env
In that file, put in these values:
POSTGRES_PASSWORD=<Insert random secure password>
MINIO_ROOT_PASSWORD=<Insert random secure password>
MINIO_BROWSER_REDIRECT_URL=https://s3-admin.yourdomain.com
SECRET_KEY=<Insert Hex value you created in prereq section>
UTILS_SECRET=<Insert Hex value you created in prereq section>
WIKI_URL=https://wiki.yourdomain.com
WIKIDATA_URL=https://s3.yourdomain.com
Now we are ready to put up our docker container. Run the command inside of the folder /docker/outline-wiki
docker-compose up -dYour container should now start up and you can verify that the containers are up by running the comand:
sudo docker psShould result in something like this:

Now go to https://wiki.yourdomain.com and you should be meet by your new wiki:

Click continue with slack.
Sign in with your slack credentials.
You're done :)
Post installation fixes
after the install i saw some minor issues, i list them here.
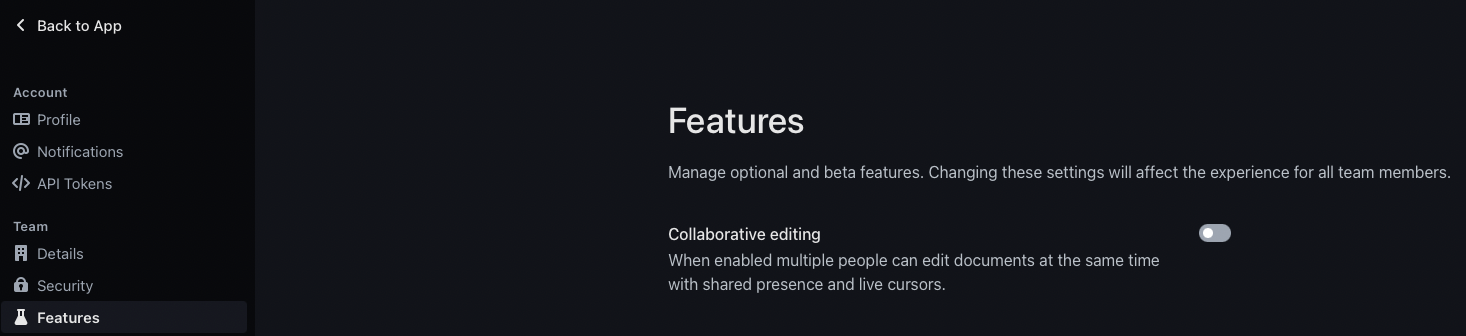
Unable to edit
I could not edit pages. In my case it was due to the collaboration edit function was enabled. Go to Settings -> Features and disable "Collaborative editing"
in my case im satisfied that this feature is off. Since i'm the onlyone who will use this wiki. But in a team situation there might be different scenario.
Unable to upload pictures
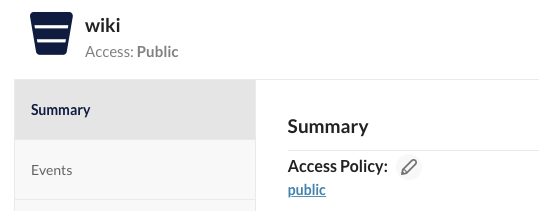
Once i got the edit function up and running, i noted that the s3 minio bucket did not work. So i did the following
- Go to your https://s3-admin.yourdomain.com site. Log in with the user minio and the credentials you created in the .env file
- Once logged in i saw that the docker-compose did not create any bucket for me. So create the wikibucket by continueing this guide:
- Go to buckets, and create a new bucket called wiki
- Once the bucket is created, click "manage"
- Set the bucket accesspolicy to Public:
Thats about it :)